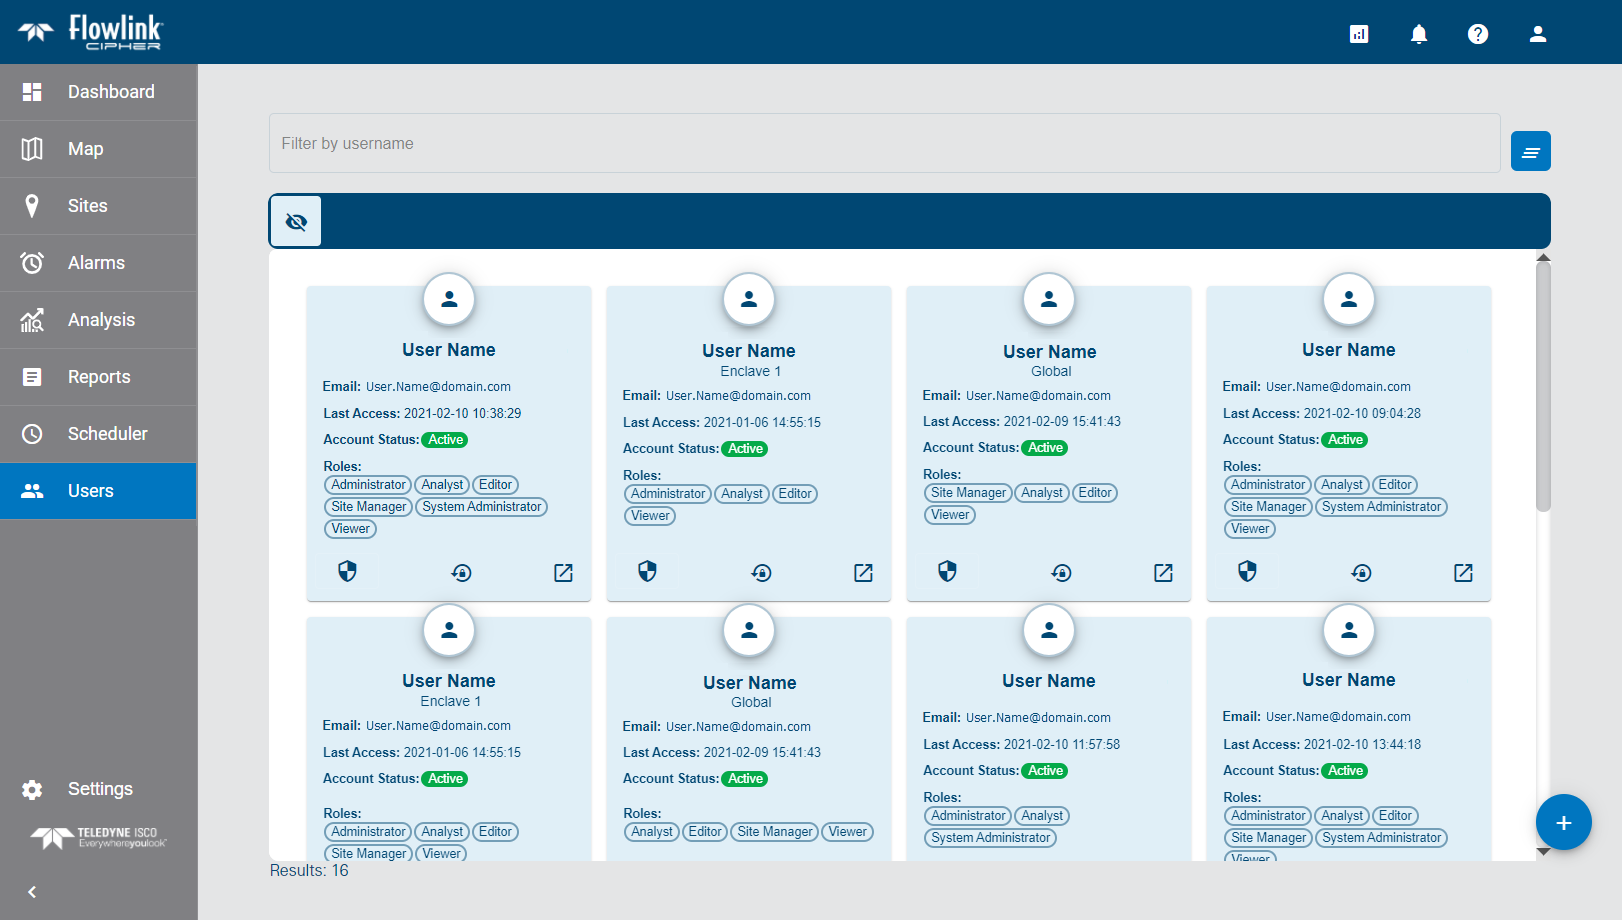
The Users screen displays a list of users that have access to Flowlink Cipher.
Each user is represented by a card that provides information about the user account including:
• the first and last name of the user
• the tenant to which the account is assigned
• the status of the account (Active or Inactive)
• the email address associated with the account
• the timestamp of when the user last accessed Flowlink Cipher
• the roles assigned to the user account
Buttons in each user card provide additional options.
Button | Description |
|---|---|
| Change Tenant This button is used to change the tenant to which a user is assigned. Some user cards will display a different icon for this button 1. Click Change Tenant. 2. Select a tenant from the list displayed. |
| Reset Password This button allows an Administrator user to reset the password on a user account. Users without the Administrator role do not have access to this functionality. 1. Click Reset Password. A message is displayed asking for confirmation to reset the password for the user account. 2. Click Yes to reset the password. A Password Reset email is sent to the email address for the user account that was reset. The email contains a link to the Flowlink Cipher Login page and a temporary password, similar to creating a new user account. 3. Enter the temporary password from the email and click Login. The Set New Password page is opened.
4. Type a new password in both password fields. 5. Review the End-User License Agreement and click the check box to accept the Terms of use. 6. Click Complete Account Setup. A message is displayed confirming that the password has been updated and the Flowlink Cipher login page is displayed. The new password can now be used to log into the system. |
| Go to Profile This button opens the profile page of the selected user account. This page contains the general information about the account. See User Profile for more information on profile pages. |
By default, only users with a status of Active will be displayed on this page. All user accounts are created with a status of Active, but can be changed to Inactive to disable the account if it is no longer used. To view user accounts with a status of Inactive, the Show Inactive Users tool  at the top of the list must be enabled.
Filter and Sort Users
The user cards can be filtered and sorted using the tools at the top of the list.
The Filter by name, email address or tenant field can be used to search for a specific user using any of the characters that appear in the user's name or email address, or users assigned to a specific tenant. As characters are entered in the field, the list of available users will be filtered. The text is matched to consecutive characters in the user name, email address or tenant. The filter is not case sensitive, therefore upper or lower case characters can be entered. The number of users in the list is displayed in a Results field below the list. This number will update as the filter changes the users displayed in the list. The filter terms are remembered when you leave the page and are automatically reapplied if you return. The Clear all filters button ![]() can be used to clear the filtering of the user list.
can be used to clear the filtering of the user list.
The user cards can be sorted in ascending or descending order according to either the first name of the user or the tenant names. The Sort by tool  is used to select the property to use for sorting the cards. The Sort tool
  is used to choose the direction of the sorting.
Create a New User
The Users page is also used to add new users to Flowlink Cipher.
1. Click the Create New User button  .
.
The Create User dialog box is displayed.
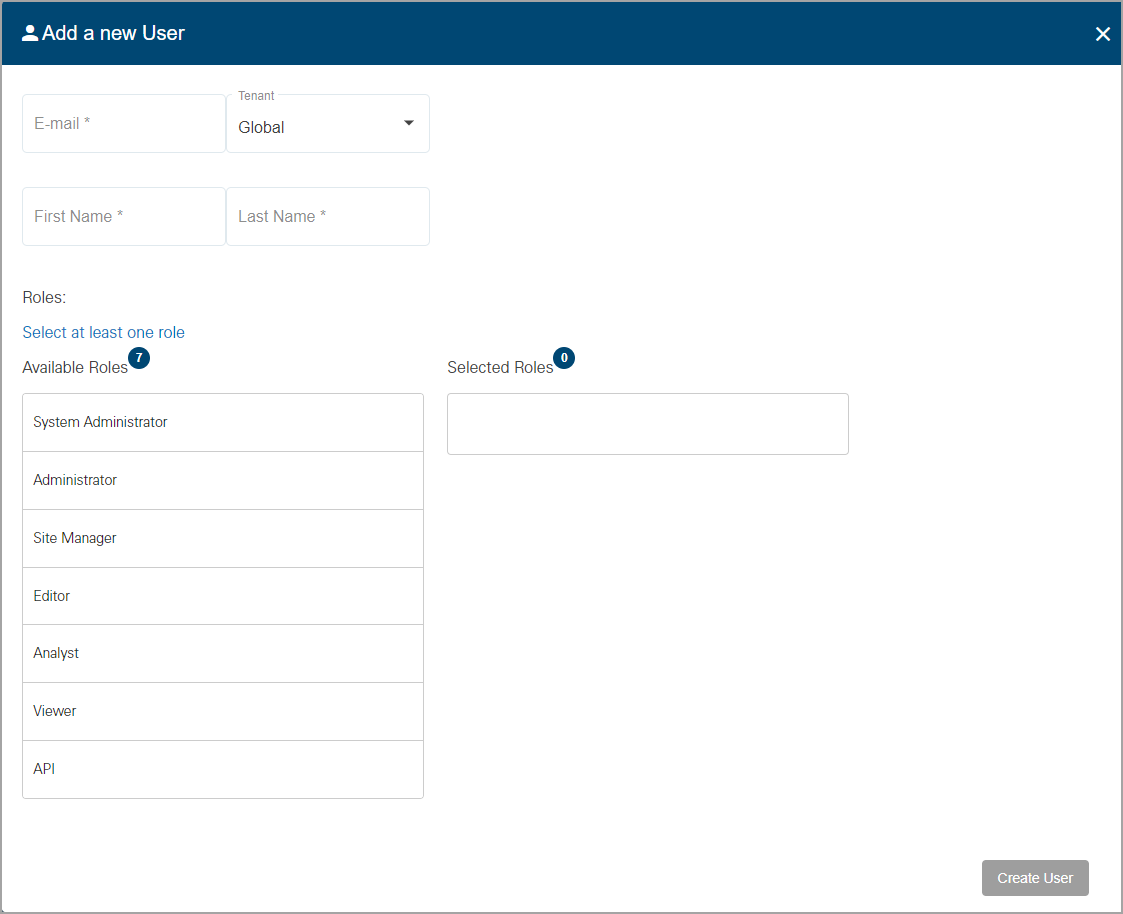
2. Type the Email address of the user. This is saved as the username for the user account.
3. Type the First Name and Last Name of the user in the appropriate fields.
All users must be assigned a role. A role provides a user account with permissions to perform tasks in the application. Different functionality is allowed with each role. The available roles are:
Role | Description |
|---|---|
System Administrator | The System Administrator role is used solely for managing tenants. This role should only be assigned to a single user in each organization. |
Administrator | The Administrator role is used to manage user accounts and global options shared by all users. Users with this role can create, edit and delete user accounts in the Users page, and view and edit the application settings in the Settings page. This role also has access to the Dashboard functionality, but only for Note type gadgets. This role cannot be used to create, edit or view sites, graphs or alarms. |
Site Manager | The Site Manager role is used to manage the sites and devices monitored by Flowlink Cipher. Users with this role have full permissions for the Dashboard, Sites and Alarms pages. The Site Manager role also has read-only access for graphs and events in the Analysis pages. |
Editor | The Editor role is used to edit data that has been ingested in the application. Users with this role have full permissions to the Dashboards, Alarms and Analysis pages, except for deleting graphs marked as Public. This role can also be used to view sites and generate graphs or datasets from the sites, but cannot be used to edit site information or site tags. |
Analyst | The Analyst role is used to analyse incoming data. Users with this role have the same permissions as the Editor role except that they cannot edit the data points in a dataset. |
Viewer | The Viewer role is a read-only account used for viewing information in Flowlink Cipher. Users with this role have full permissions on the Dashboard page and read-only access on most other pages. This role cannot be used to create graphs, datasets or alarms and can only view graphs that have been created by other users and set as Public. |
API | The API role provides users with access to the API for the purpose of uploading and downloading data to and from Cipher. If the user has been assigned to an enclave, they can only upload or download data in that enclave. Users with this role do not have access to the web application. |
4. Click the Roles field to expand a drop-down list of available roles.
5. Click the check box of each role to assign to the user account.
6. Click Create.
An activation email is then sent to the email address specified and a message is displayed confirming that the email was sent.

In the email is a link to an activation token, which launches the Account Setup page to complete the account setup. The activation token is valid for 1 week from the date the email was sent. If the account is not activated within this time period, the link will expire and the account will be disabled. If this happens, a new activation token will need to be generated using the Reset Password button on the user card.
Account Setup
When logging in with a new user account for the first time, the Account Setup page will be displayed to specify a password for the user account. This will replace the temporary password that was provided in the activation email. The End-User License Agreement for the application is also provided on this page and must be read and accepted before the user will be given access to Flowlink Cipher.
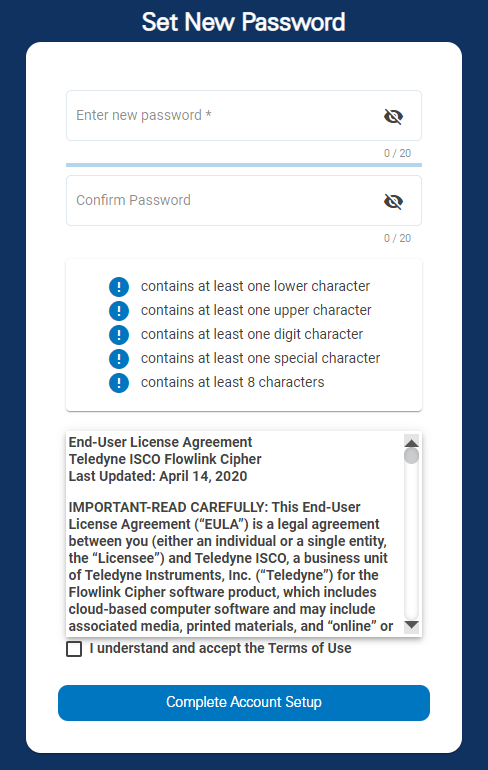
The password fields need to be populated with a password for the user account. The password must meet the security requirements in order to be accepted. The password requirements are displayed when the user clicks in the Enter new password field.
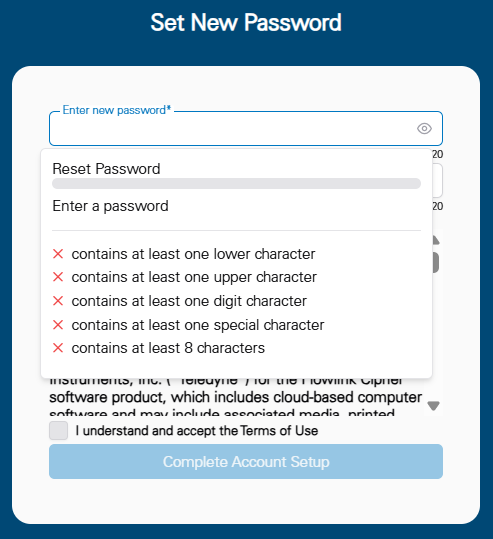
7. Type a password in the Enter new password field.
For security reasons, the characters will be hidden as the password is entered. The visible toggle  in each password field can be used to view the characters as they are entered.
8. Re-enter the password in the Confirm Password field.
9. Type the First Name and the Last Name of the user for which the account is being created.
10. Read the Terms of Use, making sure to scroll to the end of the content to enable the check box for the terms.
11. Click the Terms of Use check box to accept the terms.
12. Click Complete Account Setup.
The new account is created and added to the Users page. The Go to Profile button can now be clicked to go to the Profile page for the user account. This page is used to enter additional information about the user. See User Profile for more information.


